Minggu, 07 Oktober 2007

Posterolateral Instability of the Knee & Knee Dislocations

POSTEROLATERAL INSTABILITY

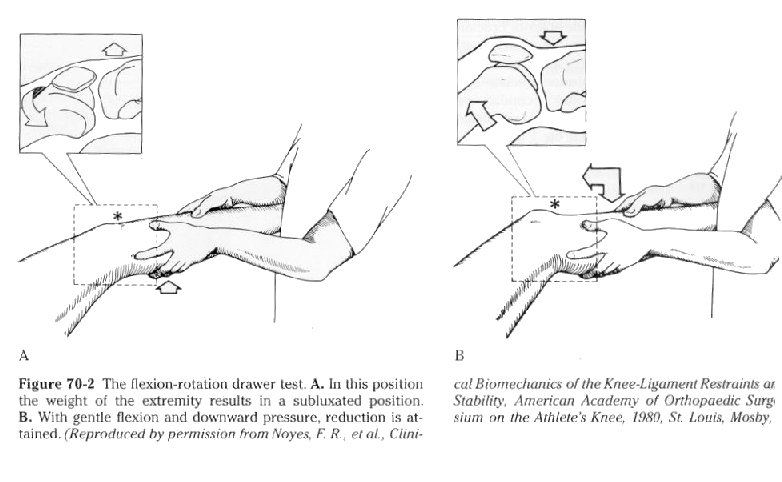
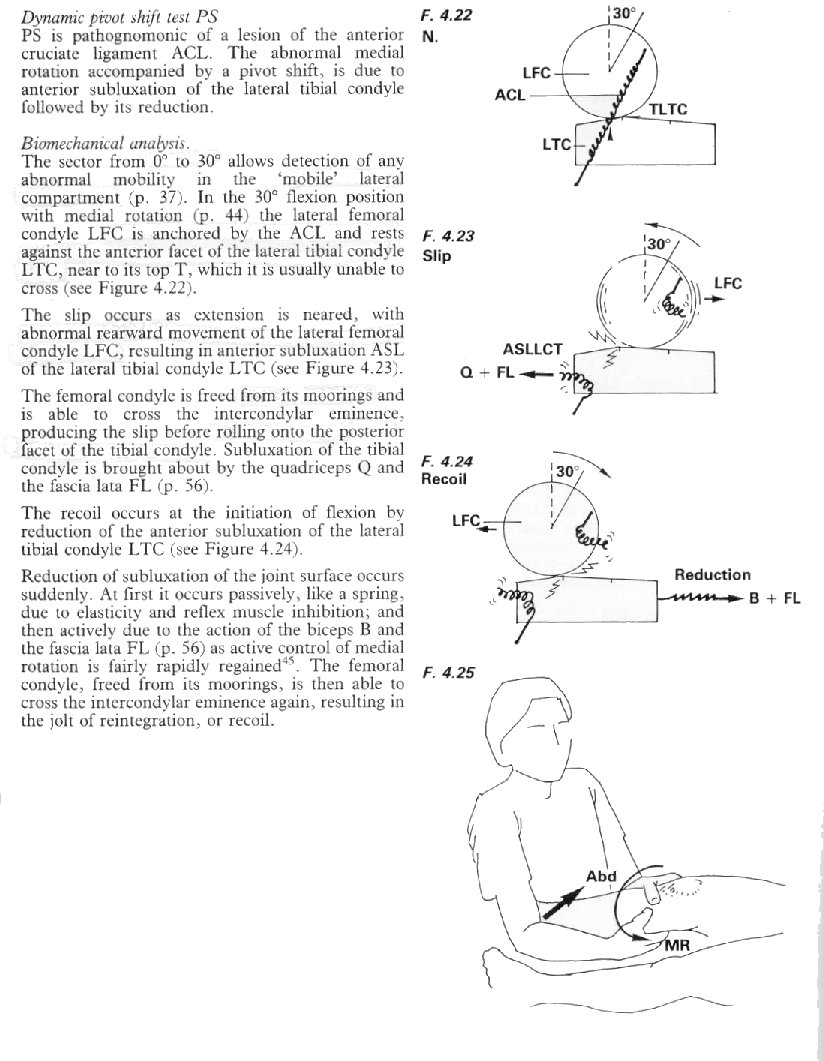
= when stress testing the lateral tibial plateau rotates posteriorly in relation to the femur with lateral opening of joint

associated with knee dislocation (see below)

Posterolateral injury components

  1. popliteus tendon

  2. arcuate ligament

  3. LCL and lateral capsular ligaments

Tests:

Management:

  • Surgery always required

Preop planning:

  • X-Rays:

    • Segond fracture - avulsion fracture of lateral capsule off tibia - indicative of an associated ACL injury - seen on AP view.

  • MRI

    • allows assessement of posterolateral corner injury as well as ACL & PCL

    • assess which structures of the posterolateral corner are injured and whether the injuries are mid-substance or whether they have been avulsed from the fibula or femur

Arthroscopic findings:

  • "drive through sign" = >1cm of lateral opening and exceptional posterior visualization of the lateral meniscus

Procedure:

  • Exposure: Identify the IT band, hamstrings, fibular head, peroneal nerve, and femoral attachment of the LCL

  • Incision: - straight lateral incision centered over the lateral joint line; - proximally the subcutaneous flaps are mobilized to allow identification of the anterior and posterior borders of the IT band; - the anterior and posterior attachments of this band are freed to allow anterior and posteiror mobilization; - peroneal nerve is identified posterior to the biceps and is followed distally around the fibular neck (look for evidence of nerve injury

  • Sequential assessment of injury: - look for avulsion of IT band off of Gerdy's tubercle, peroneal nerve injury, biceps avulsion off of the fibular head, LCL injury (proximal or distal), and popliteus avulsion

  • Repair will procede from the deepest structures to the most superficial structures

    1. lateral meniscus repair

    2. Capsular repair

    3. Reattach popliteus to its femoral attachment (bone anchor) and to its fibular head attachment (pull thru sutures)

    4. Arcuate ligament: - reconstruction/repair of this structure is necessary to avoid excessive tibial rotation, especially as the knee moves from extension to flexion; - remember that the biceps tendon, LCL, and arcuate complex all insert on the fibular styloid, and that if there is a fibular styloid avulsion, osseous reattachement will restore all three structures; Achilles tendon allograft may be indicated; - main goal is to create a checkrein to external rotation;

    5. LCL repair / advancement on its femoral attachment

    6. Biceps Tendon

    7. IT Band: - note that the posterior 1/3 of the IT band attaches to the femoral epicondyle; - if this attachement is deficient, it should be repaired to help restore lateral stability


KNEE DISLOCATIONS

Clinical Findings:

  1. Popliteal artery & vein injury is common

    • note that knee dislocations that have spontaneously reduced may look benign but may lead to thrombosis of the popliteal artery

    • popliteal artery is usually tethered proximally at adductor hiatus & distally by arch of soleus

    • injury to the popliteal artery may initially manifest as an intimal tear or intraluminal thrombus.

  2. Peroneal nerve injury:

    • in 20% to 40% (half of these palsies are permanent)

    • w/ peroneal nerve injury, be highly suspect for vascular injury; - even if pulse returns following reduction, consider need for arteriogram, since incidence of intimal injury is high w/ concomitant nerve injury

  3. Both cruciates and least one collateral ligament are usually disrupted

Classification:

  • Anterior (31%)

    • hyperextension of knee (may need > 30 deg of hyperextension to produce this injury)

    • often PCL & ACL torn

    • either the MCL or LCL or both will usually be injured

    • alternatively, hyper-extension injuries may cause disruption of the ACL and posterior capsule while the PCL is spared

    • Popliteal artery injury

  • Posterior (25%)

    • disruption of both cruciate ligaments

    • possible extensor mechanism disruption

    • avulsion of or complete disruption of popliteal artery

  • Lateral (13%)

  • Medial ( 3%)

  • Rotatory ( 4% - usually posterolateral)

Investigations:

1. X-Rays:

  • Associated radiographic findings:

    1. Tibial plateau fracture

    2. Proximal fibula fracture

    3. Avulsion fracture of Gerdy's Tubercle

    4. Intercondylar spine fracture

    5. Avulsion of Fibular Head

2. Arteriogram - indications unclear

3. MRI - see above

Management:

  • Reduction

    • may be complicated by interposed soft tissue

    • External fixation - it is important that the external fixator pin sites will not interfere with the ACL/PCL tunnel sites (during future ligament reconstruction)

  • Vascular Inuries

    • the worst error to make is to underestimate the need to promptly treat these injuries

  • Nerve injury:

    • the location of the nerve injury may be well above the knee joint

  • Assessment of ligament injuries:

    • EUA

  • Surgical Treatment of Ligament Injuries:

    • if vascular injury has been previously repair, get clearance from the vascular surgeon to utilize a tourniquet

    • Deep to superficial (as above)
Neurological Examination

SUMMARY


Equipment Needed

  • Reflex Hammer
  • 128 and 512 (or 1024) Hz Tuning Forks
  • Wooden Handled Cotton Swabs
  • Paper Clips

General Considerations

  • Always consider left to right symmetry
  • Consider central vs. peripheral deficits
  • Organize your thinking into seven categories:
  1. Mental Status
  2. Cranial Nerves
  3. Motor
  4. Coordination and Gait
  5. Reflexes
  6. Sensory
  7. Special Tests

Motor

Observation

  • Involuntary Movements
  • Muscle Symmetry
    • Left to Right
    • Proximal vs. Distal
  • Atrophy
    • Pay particular attention to the hands, shoulders, and thighs.
  • Gait

Muscle Tone

  1. Ask the patient to relax.
  2. Flex and extend the patient's fingers, wrist, and elbow.
  3. Flex and extend patient's ankle and knee.
  4. There is normally a small, continuous resistance to passive movement.
  5. Observe for decreased (flaccid) or increased (rigid/spastic) tone.

Muscle Strength

  • Test strength by having the patient move against your resistance.
  • Always compare one side to the other.
  • Grade strength on a scale from 0 to 5 "out of five":

Grading Motor Strength

Grade

Description

0/5

No muscle movement

1/5

Visible muscle movement, but no movement at the joint

2/5

Movement at the joint, but not against gravity

3/5

Movement against gravity, but not against added resistance

4/5

Movement against resistance, but less than normal

5/5

Normal strength

Grade

Description

0/5

No muscle movement

1/5

Visible muscle movement, but no movement at the joint

2/5

Movement at the joint, but not against gravity

3/5

Movement against gravity, but not against added resistance

4/5

Movement against resistance, but less than normal

5/5

Normal strength

  • Test the following:
  1. Flexion at the elbow (C5, C6, biceps)
  2. Extension at the elbow (C6, C7, C8, triceps)
  3. Extension at the wrist (C6, C7, C8, radial nerve)
  4. Squeeze two of your fingers as hard as possible ("grip," C7, C8, T1)
  5. Finger abduction (C8, T1, ulnar nerve)
  6. Oppostion of the thumb (C8, T1, median nerve)
  7. Flexion at the hip (L2, L3, L4, iliopsoas)
  8. Adduction at the hips (L2, L3, L4, adductors)
  9. Abduction at the hips (L4, L5, S1, gluteus medius and minimus)
  10. Extension at the hips (S1, gluteus maximus)
  11. Extension at the knee (L2, L3, L4, quadriceps)
  12. Flexion at the knee (L4, L5, S1, S2, hamstrings)
  13. Dorsiflexion at the ankle (L4, L5)
  14. Plantar flexion (S1)

Pronator Drift

  1. Ask the patient to stand for 20-30 seconds with both arms straight forward, palms up, and eyes closed.
  2. Instruct the patient to keep the arms still while you tap them briskly downward.
  3. The patient will not be able to maintain extension and supination (and "drift into pronation) with upper motor neuron disease.

Coordination and Gait

Rapid Alternating Movements

  1. Ask the patient to strike one hand on the thigh, raise the hand, turn it over, and then strike it back down as fast as possible.
  2. Ask the patient to tap the distal joint of the thumb with the tip of the index finger as fast as possible.
  3. Ask the patient to tap your hand with the ball of each foot as fast as possible.

Point-to-Point Movements

  1. Ask the patient to touch your index finger and their nose alternately several times. Move your finger about as the patient performs this task. [p519]
  2. Hold your finger still so that the patient can touch it with one arm and finger outstretched. Ask the patient to move their arm and return to your finger with their eyes closed.
  3. Ask the patient to place one heel on the opposite knee and run it down the shin to the big toe. Repeat with the patient's eyes closed.

Romberg

  1. Be prepared to catch the patient if they are unstable.
  2. Ask the patient to stand with the feet together and eyes closed for 5-10 seconds without support.
  3. The test is said to be positive if the patient becomes unstable (indicating a vestibular or proprioceptive problem).

Gait

Ask the patient to:

  1. Walk across the room, turn and come back
  2. Walk heel-to-toe in a straight line
  3. Walk on their toes in a straight line
  4. Walk on their heels in a straight line
  5. Hop in place on each foot
  6. Do a shallow knee bend
  7. Rise from a sitting position

Reflexes

Deep Tendon Reflexes

  • The patient must be relaxed and positioned properly before starting.
  • Reflex response depends on the force of your stimulus. Use no more force than you need to provoke a definite response.
  • Reflexes can be reinforced by having the patient perform isometric contraction of other muscles (clenched teeth).
  • Reflexes should be graded on a 0 to 4 "plus" scale:

Tendon Reflex Grading Scale

Grade

Description

0

Absent

1+ or +

Hypoactive

2+ or ++

"Normal"

3+ or +++

Hyperactive without clonus

4+ or ++++

Hyperactive with clonus

Grade

Description

0

Absent

1+ or +

Hypoactive

2+ or ++

"Normal"

3+ or +++

Hyperactive without clonus

4+ or ++++

Hyperactive with clonus

  • Biceps (C5, C6)
  1. The patient's arm should be partially flexed at the elbow with the palm down.
  2. Place your thumb or finger firmly on the biceps tendon.
  3. Strike your finger with the reflex hammer.
  4. You should feel the response even if you can't see it.
  • Triceps (C6, C7)
  1. Support the upper arm and let the patient's forearm hang free.
  2. Strike the triceps tendon above the elbow with the broad side of the hammer.
  3. If the patient is sitting or lying down, flex the patient's arm at the elbow and hold it close to the chest.
  • Brachioradialis (C5, C6)
  1. Have the patient rest the forearm on the abdomen or lap.
  2. Strike the radius about 1-2 inches above the wrist.
  3. Watch for flexion and supination of the forearm.
  • Abdominal (T8, T9, T10, T11, T12)
  1. Use a blunt object such as a key or tongue blade.
  2. Stroke the abdomen lightly on each side in an inward and downward direction above (T8, T9, T10) and below the umbilicus (T10, T11, T12).
  3. Note the contraction of the abdominal muscles and deviation of the umbilicus towards the stimulus.
  • Knee (L2, L3, L4)
  1. Have the patient sit or lie down with the knee flexed.
  2. Strike the patellar tendon just below the patella.
  3. Note contraction of the quadraceps and extension of the knee.
  • Ankle (S1, S2)
  1. Dorsiflex the foot at the ankle.
  2. Strike the Achilles tendon.
  3. Watch and feel for plantar flexion at the ankle.

Clonus

If the reflexes seem hyperactive, test for ankle clonus:

  1. Support the knee in a partly flexed position.
  2. With the patient relaxed, quickly dorsiflex the foot.
  3. Observe for rhythmic oscillations.

Plantar Response (Babinski)

  1. Stroke the lateral aspect of the sole of each foot with the end of a reflex hammer or key.
  2. Note movement of the toes, normally flexion (withdrawal).
  3. Extension of the big toe with fanning of the other toes is abnormal. This is referred to as a positive Babinski.

Sensory

General

  • Explain each test before you do it.
  • Unless otherwise specified, the patient's eyes should be closed during the actual testing.
  • Compare symmetrical areas on the two sides of the body.
  • Also compare distal and proximal areas of the extremities.
  • When you detect an area of sensory loss map out its boundaries in detail.

Vibration

  • Use a low pitched tuning fork (128Hz).
  • Test with a non-vibrating tuning fork first to ensure that the patient is responding to the correct stimulus.
  1. Place the stem of the fork over the distal interphalangeal joint of the patient's index fingers and big toes.
  2. Ask the patient to tell you if they feel the vibration.
  • If vibration sense is impaired proceed proximally:
  1. Wrists
  2. Elbows
  3. Medial malleoli
  4. Patellas
  5. Anterior superior iliac spines
  6. Spinous processes
  7. Clavicles

Position Sense

  1. Grasp the patient's big toe and hold it away from the other toes to avoid friction.
  2. Show the patient "up" and "down."
  3. With the patient's eyes closed ask the patient to identify the direction you move the toe.
  4. If position sense is impaired move proximally to test the ankle joint.
  5. Test the fingers in a similar fashion.
  6. If indicated move proximally to the metacarpophalangeal joints, wrists, and elbows.

Subjective Light Touch

  • Use your fingers to touch the skin lightly on both sides simultaneously.
  • Test several areas on both the upper and lower extremities.
  • Ask the patient to tell you if there is difference from side to side or other "strange" sensations.

Dermatomal Testing

If vibration, position sense, and subjective light touch are normal in the fingers and toes you may assume the rest of this exam will be normal.

Pain

  • Use a suitable sharp object to test "sharp" or "dull" sensation.
  • Test the following areas:
  1. Shoulders (C4)
  2. Inner and outer aspects of the forearms (C6 and T1)
  3. Thumbs and little fingers (C6 and C8)
  4. Front of both thighs (L2)
  5. Medial and lateral aspect of both calves (L4 and L5)
  6. Little toes (S1)

Temperature

  • Often omitted if pain sensation is normal.
  • Use a tuning fork heated or cooled by water and ask the patient to identify "hot" or "cold."
  • Test the following areas:
  1. Shoulders (C4)
  2. Inner and outer aspects of the forearms (C6 and T1)
  3. Thumbs and little fingers (C6 and C8)
  4. Front of both thighs (L2)
  5. Medial and lateral aspect of both calves (L4 and L5)
  6. Little toes (S1)

Light Touch

  • Use a fine whisp of cotton or your fingers to touch the skin lightly.
  • Ask the patient to respond whenever a touch is felt.
  • Test the following areas:
  1. Shoulders (C4)
  2. Inner and outer aspects of the forearms (C6 and T1)
  3. Thumbs and little fingers (C6 and C8)
  4. Front of both thighs (L2)
  5. Medial and lateral aspect of both calves (L4 and L5)
  6. Little toes (S1)

Discrimination

Since these tests are dependent on touch and position sense, they cannot be performed when the tests above are clearly abnormal.

  • Graphesthesia
  1. With the blunt end of a pen or pencil, draw a large number in the patient's palm.
  2. Ask the patient to identify the number.
  • Stereognosis
  1. Use as an alternative to graphesthesia.
  2. Place a familiar object in the patient's hand (coin, paper clip, pencil, etc.).
  3. Ask the patient to tell you what it is.
  • Two Point Discrimination
  1. Use in situations where more quantitative data are needed, such as following the progression of a cortical lesion.
  2. Use an opened paper clip to touch the patient's finger pads in two places simultaneously.
  3. Alternate irregularly with one point touch.
  4. Ask the patient to identify "one" or "two."
  5. Find the minimal distance at which the patient can discriminate.

Knee - Pivot Shift Test

Jules Froment

1878-1946

Jules Froment was Professor of Medicine at Lyons, and devoted his life to neurology, combining diligent observation, a philosophical approach and debating skill.

Graduating in 1906 with a thesis on disease of the heart in thyrotoxicosis, he remained at Lyons until the Great War. After a year at the front, he joined a nerve injuries unit at Rennes, and later was at Paris with Babinski. During this time he evolved a series of tests for nerve dysfunction, the best known being his sign of ulnar nerve weakness; another was loss of the hollow of the anatomical snuff box in radial nerve injury.

After the war he ran a Red Cross Hospital in Lyons, and the encephalitis epidemic of 1918-1922 provided another intellectual challenge. In 1926 he nearly died as a result of being severely injured by one of his patients.

Froment pointed out the difference between a pinch grip and grasping, both of which are impaired by a low ulnar nerve palsy due to weakness of adductor pollicis. He introduced the following test to show this. Today it is used to assess flexor pollicis brevis.

Froment's Signe du Pouce: 1915

In order to demonstrate the disorder of the grip it is sufficient for the patient to take hold of any object between the thumb and other fingers. Two features may be observed: first, the weakness of the grip, and secondly the abnormal position of the thumb, although, while at rest, nothing would lead one to suspect it.

It is when a thin object is gripped that the faulty position of the thumb is most clearly evident. In practice, we hold out a folded newspaper to the patient; he is asked to pull it hard with the strong band and then with the affected hand, while we pull it fairly firmly away. This is what is observed: on the healthy side the thumb is in contact with the object gripped all the way along-the distal phalanx is extended or only slightly flexed. On the paralysed side the thumb resembles a flying buttress, the distal phalanx is markedly flexed and no matter what force is used it only holds the object by the very tip of the pulp. Very often there is a gap between the thumb and the newspaper, or, to be more exact, between the thumb and the side of the palm. (It is necessary to pull bard: the grip with the fixed thumb is only pathological when the grip is forcible).

This asymmetric attitude between the thumbs appears very dearly when the patient, taking the newspaper in both hands, pulls with different strength at both ends. This can clearly be seen in the photograph.

Hip Examination

Updated by Ahmed Dinah, May 2004

Patient must be suitably undressed (down to underwear)

First examine patient standing and then lying down.

Look, feel, move and special tests.

1. PATIENT STANDING

Look

  • Front and back of pelvis/hips and legs: any ischaemic or trophic changes
  • Swelling (e.g. lipoma) Scars (previous surgery)
  • Sinuses (infection/neuropathic ulcers)
  • Wasting (old polio, Carcot-Marie-Tooth) or hypertrophy (e.g. calf pseudo-hypertrophy in muscular dystrophy)
  • Deformity (leg length inequality, pes cavus, scoliosis)

Feel (Not a lot!)

  • Assess any swellings
  • Assess pelvic tilt by palpating iliac crests

Move

  • Gait:
    • Trendelenburg (pelvic sway/tilt, aka waddling gait if bilateral)
    • Broad-based (ataxia)
    • High-stepping (loss of proprioception/drop foot)
    • Antalgic (mention "â€Å"with reduced stance phase on left/right side)
    • Smooth progression of phases of gait cycle: stance, toe-off, swing and heel-strike
    • In-toeing (persistent femoral anteversion: most PFA is not clinically significant as both Monica Selles and Andre Agassi manage quite well with theirs!)
    • Appropriate stride length
    • Sufficient flexion/extension at hip/knee ankle and foot: Any fixed contractures?
    • Observe arm-swing and balance on turning around
  • Trendelenburg test/sign:
    • Make sure pelvis is horizontal by palpating iliac crests/ASIS.
    • Ask patient to stand on one leg and then on the other.
    • Assess any pelvic tilt by keeping an index finger on each ASIS.
    • Normal (Trendelenburg negative): In the one-legged stance, the unsupported side of the pelvis remains at the same level as the side the patient is standing on. In fact, the unsupported side may even rise a little, because of powerful contraction of hip abductors on the stance leg.
    • Abnormal (Trendelenburg positive): In the one-legged stance, the unsupported side of the pelvis drops below the level as the side the patient is standing on. This is because of (abnormal) weakness of hip abductors on the stance leg. The latter hip joint may therefore be abnormal. In addition, the patient may try to compensate for this pelvic tilt by swinging his/her torso away from the unsupported side, i.e. towards the abnormal hip.

If balance is a problem, face the patient and ask them to place their hands on yours to support him/her as he/she does alternate one-legged stance. Increased asymmetrical pressure on one hand indicates a positive Trendelenburg test, on the side of the abnormal hip.

A 'delayed' Trendelemburg has also been described, where the pelvic tilt appears after a minute or so: this indicates abnormal fatiguability of the hip abductors.

  • Romberg's test (for sake of completeness!)

This assesses proprioception/balance (dorsal columns of spinal cord/spino-cerebellar pathways).

Ask the patient to stand with heels together and hands by the side (Remember: heels together). Ask the patient to close his/her eyes and observe for swaying for about 10 seconds. Most people sway a bit but then quickly decrease the amplitude of swaying. If however, the swaying is not corrected, or the patient opens the eyes or takes a step to regain balance, Romberg's test is positive. When doing this test, stand facing the patient with your arms outstretched and hands are at the level of the patient's shoulders to catch or stabilise him/her in case of a positive Romberg's test. DO NOT LET THE PATIENT FALL!

2. PATIENT LYING DOWN

Look

  • Observe the patient climb onto the examination couch, assessing hip/knee/ankle flexion and extension.
  • Assess attitude of joints for any fixed flexion deformity.

Feel

  • Assess any swellings.
  • Palpate the groin, and greater trochanter area for tenderness.
  • Measurement can be done here or at the end.
  • Measure true and apparent leg lengths (ASIS to medial malleolus, and then umbilicus or xiphisternum to medial malleolus). This is inherently inaccurate, especially if you can't find the ASIS or medial malleolus because of generous adipose tissue. Also, many people have asymptomatic leg length inequality of up to 1cm.
  • If there is a true leg length discrepancy, determine which bone/segment of the lower limb is short.
    • It may be below or above the knee (See Galeazzi test below).
    • If above the knee, it may be above or below the greater trochanter. Drop a perpendicular from the side of the ASIS and measure distance from greater trochanter to this line.
    • If above the trochanter, it may be the femoral neck (varus/valgus neck) or head (DDH): Don't forget to ask yourself "Is the hip in joint?" as a dislocated hip will cause a positive Trendelenburg and leg length inequality. It is difficult to do Ortolani or Barlow's test in older children and well nigh impossible in adults! However, inability to feel a femoral pulse on one side may indicate that the femoral head is out of the (true) acetabulum.

Move

1. Galeazzi test (If leg length discrepancy has been detected on measurement)

Ask the patient to flex hips to about 45 o and knees to about 90 o . Make sure the heels are together on the couch, with medial malleoli touching. Look at the knees from the side to see if they are at the same level. If one is proximal to the other, there is femoral shortening; if one is distal to the other there is tibial shortening.

2. Range of movements: Patients can appear to have good range of movements in spite of stiff hips, by tilting the pelvis. To detect this 'trick' movement, place a finger on the ASIS contralateral to the hip being examined: true hip movement ends when the pelvis begins to move (similar to differentiating true gleno-humeral from scapular movements in the shoulder)

  • Flexion can be assessed with the patient supine, but extension is best assessed with the patient in the lateral position.

Can the patient flex hip in a straight line or does the leg roll into external rotation with flexion? This may be a retroverted femoral neck or a slipped proximal femoral epiphysis.

  • Internal and external rotation can be assessed with the hip in extension (watch patella, not foot) or in flexion (flex knee and use tibia as goniometer).

Rotation is often the first movement to be limited by pain in degenerative/inflammatory conditions

Femoral neck anteversion presents with limited external rotation (can't sit cross-legged) and increased internal rotation (television position), allowing patellae to 'kiss' (hip extended) or allowing flexed knees to touch couch. Internal and external rotation can be done with the patient prone, but beware not to confuse internal and external rotation. In the prone position, thigh-foot angle (tibial torsion) can also be assessed.

  • Abduction/Adduction

Remember to distinguish true hip movements from pelvic tilt.

  1. Thomas test: To detect fixed flexion deformity of the hip

FFD of the hip means that the patient cannot lay the back of the thigh on the couch when resting supine, but this can also be due to a FFD on the knee. If the knee has no FFD, the patient can lay the leg flat on the couch by a trick movement of 'extension' of the pelvis, resulting from increased lumbar lordosis. Abolishing this lumbar lordosis will therefore unmask this FFD, and this is the basis of the Thomas test.

Place your hand behind the small of the patient's back, between it and the couch. There is normally a small gap here due to normal lumbar lordosis. Abolish the lumbar lordosis by asking the patient to flex the hip ("̢ہ"Bring you knee up to your chest and hold it there with your hands, please), and feel the lumbar spine flatten out onto your hand. When you are happy that the lumbar spine is flat, see if the patient's other knee is flat on the couch. If not, measure the angle of (fixed) hip flexion. Then repeat the test asking the patient to clasp his/her other knee up against his/her chest and observe for FFD in the previously flexed hip. (NOTE: Tight trousers will give a false impression of FFD, so make sure the patient is undressed to underwear!)

Finally, it is often worth examining the back in patients with any lower leg problem.

Trendelenburg Test from: Hardcastle & Nade. JBJS(B): 67-B(5):741-6

Thomas Test

Hand Examination

LOOK

Expose the whole forearm & hand.

Look at the:

    • Dorsum, Palm,
    • Muscles - Thenar, Hypothenar, first dorsal interosseus, ADM, FCU (in forearm)
    • Congenital abnormalities
    • Open & close hand to quickly assess mass movement of the hand

FEEL

  • - ask for & feel the tender area
  • - muscles
  • - swellings
  • Palmar fascia & 1st web space (for nodules)

MOVE

  • Make a fist (active mass motion)
  • Thumb:
    • Opposition to all fingers in turn
    • Adduction, Abduction, Flexion
    • EPL = tested by asking patient to lift thumb up off a table whilst hand held palm down on table
  • EDC - extend fingers at MCPJ's
  • Interossei - Ask patient to abduct fingers (dorsal interossei); ask patient to adduct fingers (palmar interossei)
  • FDS - individually tested by holding other fingers in hyperextension
  • FDP - tested by fixing the PIPJ & thus isolating the DIPJ
  • Quadriga phenomenon ( a Quadriga = an ancient Greek four horse chariot )
    • when testing for FDS the FDP is defunctioned because the FDP tendons are combined, while the FDS muscles are separate in the forearm.
    • Following repair or reconstruction of an FDP tendon the tension must be identical to the other FDPs, since the excursion of the combined tendons is equal to the shortest tendon.

NEUROLOGICAL TESTS

Sensory:

  • 1. Autogenous zones:
    • Median nerve = volar index finger
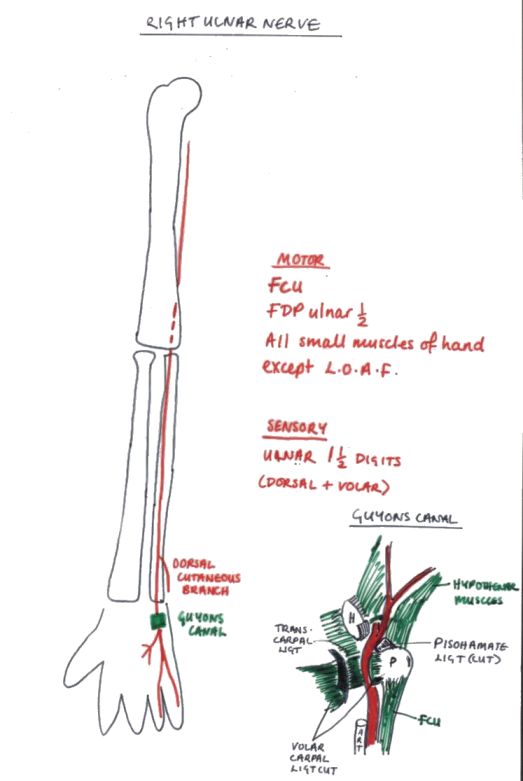
    • Ulna nerve = volar little finger
    • Radial nerve = over 1st dorsal interosseous muscle
  • 2. Superficial branch of median nerve - over thenar eminence. Discriminates between a high or low median nerve lesion.
  • 3. Dermatomes - C6 = thumb & index finger; C7 = middle finger; C8 = ring & little fingers.

Motor:

Median nerve - test APB with examiners hand over the thenar muscles from the first web space (like shaking hands)

Ulna nerve -

  • 1. ADM & 1st dorsal interosseous muscle together, by opening fingers against resistance.
  • 2. Testing ADM alone
  • 3. Wartenburg's sign - little finger lies abducted due to the unopposed action of EDM.
  • 4. Froment's test (Froment described this after watching a train commuter reading his newspaper with on thumb flexed & the other straight)
  • Ulna Paradox = less clawing of the fingers than a low lesion, because FDP is involved in high lesions thus flexing MCPJ & relaxing IPJs.

Anterior Interosseous nerve - loss of precise pinch (unable to make 'OK' sign, instead make a square) due to loss of FPL & FDP to index finger.

Posterior Interosseous nerve - Wrist dorsiflexion results in radial deviation (since ECU supplied by PIN, but brachioradialis & ECRL are supplied by the Radial nerve)

Superficial Branch of Radial Nerve:

  • Wartenburg's Neuritis (compression at the insertion of Brachioradialis)
  • Dellon's sign = active forceful pronation of the forearm & ulnar deviation of the wrist with the elbow extended by the side.
  • Tinel's test at the insertion of Brachioradialis

FUNCTIONAL TESTS

  1. Power grip / Grasp
  2. Precision Pinch (AIN)
  3. Key Grip Pinch
  4. Strength - tested on Dynamometer or Sphygmanometer

PULSES

Allens test - Ask patient to clench fist; compress both the radial & ulna arteries together with thumbs; Patient relaxes hand; Release one artery & observe capillary refill


INTRINSIC TESTING

1. Differentiate Intrinsic contracture from forearm flexor contracture

Flexing the wrist relaxes the FDS & FDP (long flexor) tendons; if patient can then flex the IPJ's with the wrist flexed there is intrinsic tightness, if they cannot it is a Volkmann's contracture.

2. Bunnel-Littler Test

For intrinsic tightness.

1) With the MCPJ in extension the intrinsics are put on a stretch. Try to flex the PIPJ with MCPJ in extension.

If it doesn't flex = tight intrinsics or joint capsule contracture.

2) With MCPJ in flexion the intrinsics are relaxed. Thus if unable to flex PIPJ= tight capsule.

NB- prior to test check that passive motion of PIPJ is possible (i.e. normal PIPJ)

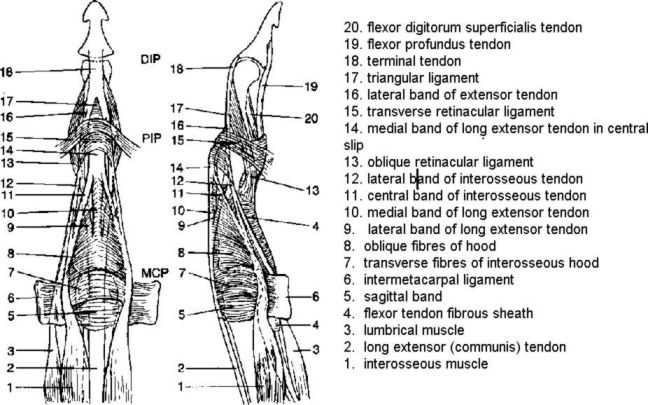
Tight intrinsics occur in: 'Intrinsic Plus' hands due to ischaemia or fibrosis of intrinsics or RA.

3. Differentiate a Lumbrical Plus Finger from an Intrinsic Plus Finger:

Lumbrical Plus Finger is manifested by intrinsic plus attitude in involved finger on attempted flexion: ( with MCPJ flexion there will be IP extension ); FDP becomes an extensor of the PIP joint; when FDP relaxes FDS can work with less antagonism and PIP can flex; treatment may involve division of the lumbrical; Causes: (lumbrical tighter than FDP) - FDP laceration or rupture distal to the Lumbrical Origin from FDP (the proximal end of the lacerated FDP tendon will retract proximally, drawing the attached lumbrical proximally as well. The effect is increased tension on the radial lateral band, which causes the PIP joint to extend); 2) Amputation of the Distal Phalanx (distal to central slip insertion); 3) Excessively Long Tendon Graft.

Bouvier's Test

  • To determine if PIPJ capsule & ext. mech. are working normally.
  • If PIPJ capsule & ext. mech are functioning normally then blocking MCPJ hyperextension allows IPJ extension.
  • Positive test occurs as a result of: attenuation of central slip, adherent central slip at PIPJ or volar subluxation of lateral bands.

Tests for Traumatic Bouttoniere Deformity

Elson's Test = Put finger over edge of table, with PIPJ flexed to 90deg. & ask Pt to extend against resistance. Weakness of resisted extension of PIPJ & hyperextension of DIPJ occurs if the central slip is ruptured. More Detail - Original Article

Passive test = flex wrist & MCPJs. Poor passive resistance to pushing over middle phalanx indicates weak extensor mechanism.

Boye's Test (1970) - If the PIPJ is held passively extended, it is then possible for the normal individual to flex the terminal interphalangeal joint in isolation. However, if the central slip has been ruptured, there is increasing difficulty in performing this action. Unfortunately this test only becomes positive when the proximal part of the ruptured central slip has retracted and become adherent to the surrounding tissues.


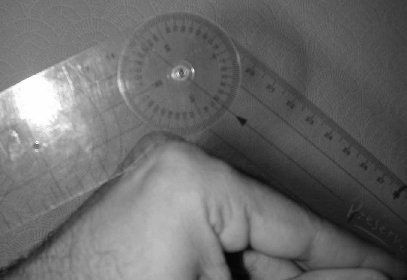
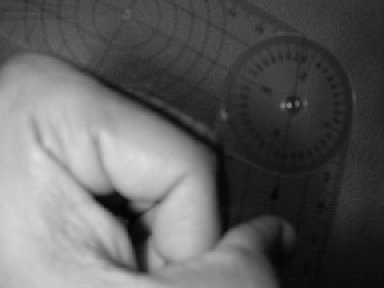
How to measure fixed contractures in the MCPJs and PIPJs in dupuytrens etc.

  • Pronate the hand so that the dorsum faces you.
  • Then keep a goniometer on the dorsum of the MCPJ.
  • For assessing the PIPJ flex the MCPJ as much as possible - this reduces the possible chance for a fixed contracture of the MCPJ to contribute to a contracture of the PIPJ


EXTENSOR COMPARTMENTS:

Compartment

Contents

Pathologic Conditions

1

APL & EPB

DeQuervain's Disease

2

ECRL & ECRB

Tennis elbow

3

EPL

Rupture at Lister's tubercle

4

EDC & EIP

Extensor Tenosynovitis

5

EDM

Rupture (rheumatoid)

6

ECU

Snapping at ulnar styloid

Foot & Ankle Examination

LOOK

Expose the whole lower leg and foot.

Examine the soles of the patient's shoes for signs of asymmetrical wear

Look for side to side asymmetry or abnormal contact w/ the ground

Walking Gait - look for a high stepping gait (foot drop, equinovarus), antalgic gait (ankle, hindfoot or midfoot pain) and short propulsive phase (forefoot pain)

Look at the patient standing (and then sitting).

  • Limb alignment (especially genu valgus with flat feet)
  • Look at the foot shapes and positions.
  • Medial arch - obliterated in pes planus, exaggerated in pes cavus (NB - look at lower back for signs of spina bifida or neurofibromatosis)
  • Hindfoot (from behind) - varus (pes cavus) or valgus (pes planus). Ask patient to stand on tiptoes and see if deformity corrects (= mobile subtalar joint).
  • 'Too many toes' sign = looking from behind more toes are seen on the lateral side of the leg. This occurs in pes planus, splayed forefoot.

The patient should sit on the examination couch with both lower legs hanging over the side. The examiner should sit on a chair at a lower level than the couch.

Overall Foot Shape:

  • neutral or rectus foot - no overall deformity
  • flat foot - heel valgus, low arch, commonly forefoot abduction and supination. The subtalar joint is commonly in the overpronated position in stance and may be even more so on walking. Distinguish between flexible and rigid flat feet by asking the patient to stand on tiptoe to see if the arch re-appears and the heel goes into varus. Then do a single foot tiptoe test to look for tibialis posterior insufficiency. The "too many toes sign" demonstrates forefoot abduction. Manipulate the subtalar joint to identify a rigid hindfoot suggesting arthritis or a tarsal coalition. Exclude a neurological cause by appropriate examination.
  • cavus foot - typically with a plantar flexed first ray, high arch and forefoot pronation. In many cases the hindfoot is in varus and this may be fixed or mobile. Use the Coleman block test to tell the difference. Pes cavus may be associated with spinal anomalies (especially if asymmetrical) or with hereditary sensorimotor neuropathies such as Charcot-Marie-Tooth disease.
  • skewfoot - hindfoot valgus and forefoot adduction. Do the same tests for hindfoot correction as in flatfoot. Manipulate the forefoot to determine correctability of adduction.
  • metatarsus adductus - neutral hindfoot and adduction of the metatarsus (some patients have some forefoot supination too). Commonly seen in pre-school children when it is usually correctable, but also in adults when it is often relatively fixed but usually in itself asymptomatic.

Look at the:

    • Skin on the Dorsum and Plantar surfaces
    • Muscle wasting
    • Nail condition and hygiene
    • Bony prominences or exostoses
    • Check Dorsalis Pedis & Posterior Tibial Pulses

FEEL

- Ask for & feel the tender area

ANKLE

Feel for tender areas, systematically checking:

  1. the anterior joint line
  2. the lateral gutter and lateral ligaments
  3. the syndesmosis
  4. the posterior joint line
  5. the medial ligament complex
  6. the medial gutter

Feel for an effusion, synovitis, deformity, bony prominence and loose bodies.

HINDFOOT & MIDFOOT

Palpate the following structures from Lateral to Dorsum to Medial surfaces:

Lateral (from distal to proximal) [Figure 1] :

  1. Styloid process of fifth metatarsal
  2. Groove in the cuboid for Peroneus Longus tendon (just posterior to 1)
  3. The peroneal tubercle (a small lateral extension of the calcaneus, separating the peroneus longus & brevis tendons)
  4. Sinus Tarsi - soft tissue depression just anterior to the lateral malleolus. (Sinus Tarsi is filled with EDB & fat pad)

Dome of Talus (made prominent by plantarflexing ankle)

Palpating the sinus tarsi & ATFL

Medial (from proximal to distal) [Figure Below]:

  1. First Metatarso-cuneiform joint.
  2. Navicular Tubercle - most obvious bony prominence in front of medial malleolus. (insertion of Tibialis Posterior tendon)
  3. Head of Talus - felt just behind the navicular, by everting & inverting the midfoot.
  4. Sustentaculum Tali - one fingerbreadth below medial malleolus. (serves as an attachment for the spring ligament & supports the talus)
  5. Medial Malleolus.

FOREFOOT

Palpate the all bones and joints in a circle, paying particular attention to:

  1. First Metatarsal head
  2. First MTPJ
  3. Metatarsal heads
  4. Web spaces

MOVE

PAED

P ronation = A bduction, E version & D orsiflexion

SAPI

S upination = A dduction, P lantarflexion & I nversion

Compare both sides

ANKLE

Active Combined - ask the patient to lift foot up (dorsiflex) and down (plantarflex)

Passive -

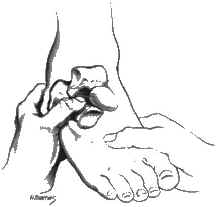
Dorsiflexion = Put one hand on the heel with the same forearm supporting the foot. The other hand supports the tibia. Dorsiflex the ankle by lifting the forearm under the foot. [Figure Below] (Normal = 55 degrees)

Plantarflexion = As in [Figure Below] below: (Normal = 15 degrees)

SUBTALAR

Hold the calcaneus with one hand and the talar head/neck with the thumb & index finger of the other hand. Apply varus and valgus stress with the hand on the calcaneus feeling for movement of the talus (at extremes of subtalar motion) with the other hand. Holding talus rather than the tibia isolates subtalar from ankle motion. (Normal = 5 degrees in each direction)

The subtalar joint can also be examined with the patient prone & the foot off the end of the couch.

MIDTARSAL (Talo-navicular & Calcaneo-cuboid joints)

Hold the calcaneus with one hand and move the forefoot medially & laterally with the other hand = adduction (20 degrees) & abduction (10 degrees). This movement cannot be seen, but can be felt.

TARSOMETATARSAL

Active motion is zero, but test the joints for stability (by pushing each joint up & down)

FIRST METATARSOPHALANGEAL JOINT

Normal ROM = 70-90 degrees DF; 45 degrees PF. Normal toe-off requires 35-40 degrees DF.


MUSCLE TESTS

TIBIALIS POSTERIOR MUSCLE & TENDON

From behind, ask the patient to do a single foot tiptoe test on both sides. Most people cannot get the affected heel off the ground at all; a few develop an acute midfoot breach. Another useful test is to get the patient to contract the tibialis posterior in the plantar-flexed/inverted position. The tendon may be weak, impalpable or palpably thin. Always examine for an Achilles contracture which is present in most people with tibialis posterior insufficiency and may only be apparent with the heel held in neutral or varus.

TIBIALIS ANTERIOR MUSCLE & TENDON (L4,5)

Ask the patient to walk on his heels with his feet inverted. The tibialis tendon can be seen prominent.

Manual test = the patient should sit on the edge of the examination table. Support his lower leg, and place your thumb near the dorsum of his foot in such a position that he must dorsiflex and invert his foot to reach it. Test resisted eversion from this position. Palpate the tibialis anterior muscle as you perform the test.

PERONEALS

Ask the patient to walk on the medial border of his feet.

Manual test = Secure the ankle by stabilising the calcaneus and with the other hand feel the peroneal tendons while testing resisted eversion. (Reverse of the Tibialis Anterior test)

Peroneal Snapping = DF & PF the ankle with the foot everted and palpate for 'snapping' of the peroneal tendons over the lateral malleolus


STABILITY TESTS

ANKLE

Test for ankle stability using the anterior draw and tilt tests. In the acute trauma situation pain makes these difficult. Sometimes local anaesthetic injection into damaged ligaments or the lateral popliteal nerve makes stress testing easier. When doing the tilt test, hold the talus at the neck, rather than the heel, as then you can be sure that any tilt is in the ankle not the subtalar joint. Instability of the syndesmosis may be palpable, usually on A-P translation of the distal fibula or valgus stress of the ankle.

OTHER TESTS

DISTAL TIBIO-FIBULAR JOINT / SYNDOSMOSIS

FIBULAR DRAW TEST

When attempting to displace the fibula anteriorly in an uninjured ankle, the examiner cannot elicit movement; - in a normal ankle the examiner frequently can feel movement when he attempts to displace the fibula posteriorly; - rarely can he initiate an increase in anterior displacement of the fibula in pts who have sustained injures to the ligamenotuos structures supporting the syndesmosis; - w/ sprain, the examiner can initiate increase in posterior displacement which usually reproduces pain;

CORONAL DRAWER TEST

talar motion in the coronal plane is another indication of syndesmotic widening.

SQUEEZE TEST

clinical test for syndesmotic instability; - w/ positive test, compression of the proximal calf causes pain at the distal syndesmosis; - anatomically, squeezing the proximal calf will cause separation of the distal fibula and specifically will cause separation of the anterior tibiofibular ligament

BLOCK TEST for Pes Cavus

Note the position of the heel when standing on a 2cm block. Then get the patient to stand with the forefoot over the medial edge. If a varus remains then the subtalar joint is fixed. If it corrects to valgus then the joint is mobile.

ACHILLES TENDON TEST (Simmonds / Thompson)

Lie the patient prone and squeeze the calf to elicit movement at the ankle = intact TA.